Thursday 19 February 2015

Korean-style Pancakes on Shrove Tuesday

When veggie daughter was just 4 months old we upped and moved from the UK to live in Seoul, Korea for five years. As a result the whole family developed a strong taste for the delights of Korean cuisine. Now, eleven years after leaving Korea this still often manifests itself as an irresistible craving for some kimchi, or maybe a bowl of soft tofu stew or bibimbap.... Sadly, Korean restaurants are few and far between where we now live, although we did just discover a new bibimbap restaurant in Cambridge last weekend. 

Anyway, on pancake day this week, veggie daughter decided she would like to try making one of our old favourites, pajeon, or Korean pancake, with spring onion. We found a couple of recipes, one of which called for mung bean flour, not something we tend to have in our larder. It also called for a spoonful of toenjang, or fermented soybean paste, which we did happen to have.  The recipe that veggie daughter found here on the Maangchi Korean food website didn't have any eggs, which I found strange as the pajeon we consumed in various Korean restaurants in the past have always tasted decidedly eggy. The Maangchi lady had even picked her own green onions from Central Park in New York! That option not being open to us, we bought a bunch of spring onions from Morrisons. Veggie daughter was determined to try the no egg recipe and I was determined to chuck in an egg or two. So we made both. Then the two of us called in cheffy son to help us decide on a winner.

Maangchi's recipe was half a cup of flour, half a cup of water, a teaspoon of toenjang, half a teaspoon of sugar mixed into a batter, poured over the sliced onions in a frying pan and fried until golden. That was where we started. We used half plain flour and half gram flour (besan, or chick pea flour).


Here's the batter and the sliced onion.

Here's veggie daughter's pancake - not bad at all! Nice and crispy, and very tasty, but cheffy son and I definitely felt it lacked the egg. The consistency was quite dense. So I took the remains of the batter, tossed in a beaten egg, a splash more milk and a bit more flour. In my usual style I didn't measure. but I wish I had, because the resulting pancake was pretty good. I tried a third pancake, throwing in yet another egg, some more milk and flour, and a squeeze of Korean kochujang, or hot chili paste. That one was not so good - the texture was heavier and more like a Canadian breakfast pancake. So it will be back to trial and error to try to emulate the second pancake. We served them with a dip made from soy sauce mixed with some rice vinegar, but veggie daughter preferred just plain soy sauce.


Friday 13 February 2015

Crispy oven baked tofu cubes


When my kids were younger it's safe to say that tofu was not one of their favourite foods. In fact one of them genuinely thought it was called toad food and felt sorry for the toads forced to live on it day after day. A lot of the dislike stemmed from the texture (after all it doesn't have a lot of flavour to dislike). This recipe produces nice flavoursome, crispy cubes, delicious with stir fried veg and noodles. It's still tolerated rather than loved by my boys, but veggie daughter is definitely a big fan. Firm tofu is drained, then marinated before being coated in cornflour and baked in the oven to crispy perfection.

You need a block of firm tofu (I use Cauldron as it's the one that all the local supermarkets seem to stock). To get the crispy texture of the finished dish, it's really important to press and drain out as much of the liquid from the tofu as possible. Wrap it in paper towel, put on a plate, place another plate on top with a weight on it and leave for about an hour. You'll need to replace the soggy paper towels a couple of times.

pressing out the liquid under heavy weights

Cut the tofu into chunks (a couple of centimetres across) and they're ready to be marinated. I have to admit that I don't normally measure the ingredients for the marinade, adding a squirt of this and a dollop of that, so it is never the same twice. I tried to keep a note of the amounts I used this time, and the recipe for this batch is below. The ingredients that go down well with my family are mainly Chinese and Korean flavours, but I think Thai green curry flavourings might work well too, or perhaps some kind of chili peanut satay marinade. I will experiment at a later date and report my findings. Basically, you dollop the various ingredients into a ziplok bag, squish them around to mix them, then throw in the tofu cubes, toss them around in the (closed) bag until they are all nicely coated, then just leave them to marinate for a few hours. I have left them for as little as half an hour when I have forgotten to marinate them earlier and actually they were fine too.

Coriander, cumin and sesame seeds ready to be crushed for the marinade

Squish the marinade ingredients together in the bag
Toss the tofu cubes in the marinade and leave in the fridge for a couple of hours or so

Crispy Oven Baked Tofu Cubes

1 400g pack of firm tofu, drained
1 tsp sesame oil
2 tsp sunflower oil
1 tsp Korean kochujang (chili paste)
1 tsp rice wine
1 tsp rice vinegar
2 tsp dark soy sauce
1 tsp hoisin sauce
1 tsp crushed coriander seeds
1/2 tsp crushed cumin seeds
1/2 tsp crushed sesame seeds
1 clove smoked garlic, crushed
2cm piece of fresh ginger, peeled and grated
1/2 tsp Chinese five spice powder

1. Wrap the tofu in paper towels and press under a heavy weight for about an hour to remove all the liquid, changing the paper towels when they become saturated.
2. Cut the tofu into chunks of about 2cm square
3. Put all the marinade ingredients into a large ziplok bag and squish them together to mix
4. Toss in the tofu, tossing around until the pieces are all coated.
5. Leave the bag in the fridge for a couple of hours or more, tossing the tofu around a couple of times to ensure that the pieces are evenly coated.
6. Add 2 tbsp cornflour (cornstarch) to the bag and toss around to coat the tofu.
7. Tip the tofu out onto a baking sheet lined with parchment or foil to aid in the clean up.
8. Bake at 200 degrees C for about  20  - 30 minutes, until the tofu is crispy and browned.

Serve with noodles or rice stir fried with vegetables and a handful of salted peanuts.


Tuesday 3 February 2015

Easy Tomato Sauce

This is the tomato sauce I served with the soya bean croquettes. It could equally be tossed with some pasta for a quick and easy meal. Or poured over some gnocchi. Sometimes I puree it and stir in some single cream. You can vary it according to what you have in the fridge - sometimes, as here, I add some chopped red pepper. Sometimes a chopped chili pepper, or a chopped courgette, some chopped aubergine, a handful of olives, some capers... it really depends what needs eating up and what you feel like. You can also throw in some chopped fresh herbs just before serving. Basil is the best.

Easy Tomato Sauce


good glug of olive oil
1 onion (red, or white, or shallot)
1 or 2 cloves garlic (I used smoked garlic this time)
1 tsp dried mixed herbs
1 400g tin of chopped tomatoes
1 red pepper (antipasto from a jar)
1 tsp sugar
salt and pepper

1. Fry the onion in the olive oil until it is soft - if you want it a bit caramelized, throw in the sugar and continue to cook until it browns, it adds a different flavour.

2. Add the garlic - don't cook it for too long or burn it as it goes bitter. Add the mixed herbs and stir around.

3. Throw in the tinned tomatoes, swishing out the tin with a little water and adding that to the pan. If you have some left over, add a glug of wine, or  a dash of balsamic vinegar, so tomato puree if you want it a bit thicker and more tomatoey. Simmer for a few minutes, taste and season.

Soya Bean Croquettes Recreated


Many years ago, before veggie daughter and her brothers were even thought of and when their dad and I were impoverished students, we decided that we would eat more vegetarian food to save money. There were many spectacular failures, but a recipe that we returned to many times was one for baked soya bean rissoles. A crispy breadcrumb coating encased a creamy mixture of soya beans and seasonings. The recipe came from a magazine, I have no idea of the title, and the torn out page became increasingly dog-eared and eventually got lost. 
Since then I have searched in vain for it online and in many vegetarian cookbooks. Determined to introduce veggie daughter to these delights, I decided that I would try to recreate them. I could remember quite a few of the ingredients, including the fact that they had a white roux or bechamel sauce base. It also occurred to me that they may not have been called rissoles, but rather croquettes. So I googled 'croquettes bechamel sauce'. Bingo! Well almost. The search revealed several recipes for Spanish croquettes (croquetas), but no soya bean version.  The versions I found had ham, cheese and chorizo in varying combinations, stirred into a bechamel sauce, coated with breadcrumbs and deep fried, which sound delicious, but would not do for my current purposes.

One thing I do remember about the recipe was that it was quite a pain to make, with the soya beans needing to be soaked, then cooked in the pressure cooker, which always made a huge mess as they were guaranteed to froth up and overflow. I also remember that shaping the croquettes was a complete sticky nightmare, with my fingers each looking like a breaded croquette at the end of the process. We used to make up a massive batch and freeze them to avoid the inevitable major kitchen clean up happening too often. Now the recipes for the Spanish croquettes all called for the bechamel to be made very thick, then left to cool and set for at least an hour or two before attempting any shaping into croquettes. An aha moment! I remember that the mixture was always warm when I tried to shape my croquettes and concluded that therein lay the reason for the sticky nightmare. 

The other difference was that our croquettes were baked in the oven rather than deep fried. Now I'm sure they would be totally delicious deep fried, but I'm not a fan of the actual process with the mess it entails along with the pervading smell that lingers for days afterwards, not to mention that deep frying is not exactly the healthiest cooking method. I wouldn't rule out frying a batch in future as a treat, but for this batch I wanted to bake them in the time honoured fashion of the old recipe. So back to google to search for 'oven baked Spanish croquette' and I find this rather tasty sounding recipe for oven-fried Spanish croquettes on the rather oddly titled website Gimmesomeoven.com. I decided to use their method for cooling and setting the bechamel mixture and for baking the shaped croquettes. I winged the rest of the recipe, but fortunately it worked! I made half the batch without cheese for dad, but veggie daughter and I preferred the cheesy ones. I think the croquettes were somewhat firmer than the old recipe, and veggie daughter was not entirely convinced that she liked the texture of the bean mixture, but on balance they received the seal of approval.

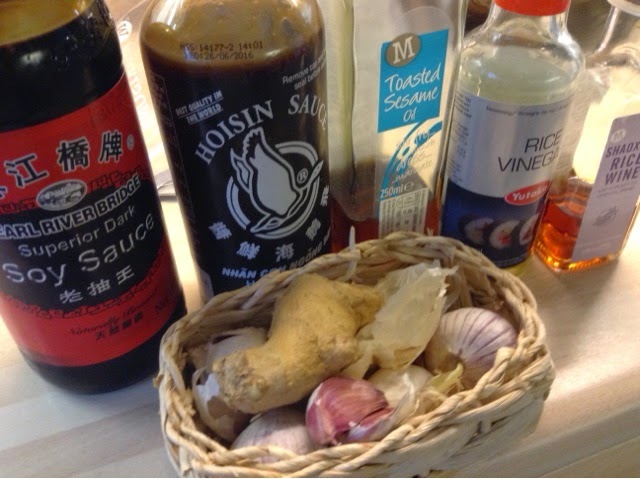
A note on the addition of smoked garlic. As far as I can remember, the original recipe did not have garlic, but I was intrigued to see smoked garlic on sale in the local supermarket. It smells delicious, almost like chorizo, which I thought would be a nod to the Spanish croquette recipes I saw.
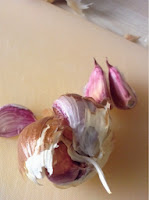
Smoked Garlic - a great new discovery!


Baked Soya Bean Croquettes


Makes 12 (enough for 3 people)

150g dried soya beans
2 bay leaves
450ml semi skimmed milk
1 small onion or shallot
50g sunflower margarine (or butter)
50g cornflour (cornstarch in the US/Canada)
25g wheatgerm
1 clove smoked garlic, crushed
1/2 tsp smoked paprika
1 tsp dried mixed herbs (eg oregano, basil, thyme)
salt and pepper
70g cheddar cheese, grated (optional)
1 egg, beaten
70g breadcrumbs (I made my own from stale bread, processed in the food processor then lightly toasted to dry them out in the oven, but panko or other packet breadcrumbs would work fine)

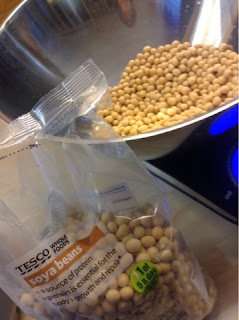
1. Cook the soya beans. If cooking in a regular saucepan they will need overnight soaking, then fast boiling for about 10 minutes, before simmering for about 3 hours. I used a pressure cooker, and covered the beans in boiling water before leaving them to soak for one hour. Drain and rinse, then put in the pressure cooker with 300ml water and a bay leaf (no salt or they will toughen). Bring to the boil in the open cooker, skim off any scum, then get them to the point where they are boiling but not rising up in the pan. Close the pan and bring to pressure and cook for 22 minutes. Switch off the heat and leave the pressure to come down on its own before opening the cooker. This was the first time I have ever cooked them without them overflowing - perhaps because it was a small quantity, but I was careful not to turn the heat up too high and the beans were cooked to perfection.


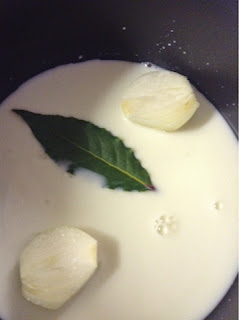
2. Meanwhile peel the onion and put in a heavy saucepan with the other bay leaf and the milk. Bring to the boil, then take off the heat and leave to infuse for an hour or so.
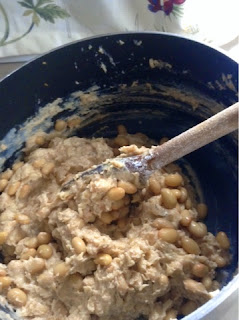
3. Make the bechamel sauce: melt the sunflower margarine, stir in the cornflour and cook gently for 2 or 3 minutes, stirring constantly. Stir in the strained milk and heat until thickened, stirring to get rid of any lumps and to stop the mixture from sticking. Stir in the wheatgerm, smoked garlic, paprika and herbs. Taste and season with salt and freshly ground black pepper. Mix in the cooked, strained beans and the cheese if using. Cover and leave in the fridge for an hour or two to set firmly.

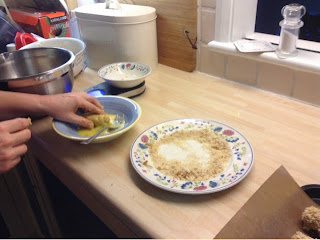
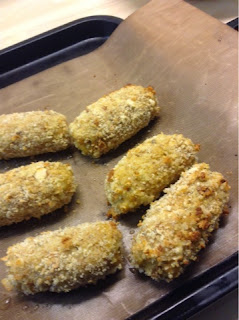
4. Put the beaten egg in a bowl, and the breadcrumbs on a plate. Shape 50g lumps of the mixture into logs and dip each into the egg, then roll in the breadcrumbs to coat. Place on an greased baking tray. Put them in the fridge for at least 20 minutes to firm up before baking.

5. Preheat the oven to 200 degrees C. Spray the croquettes with olive oil or cooking spray, then bake them for about 15 minutes until they are golden brown. 


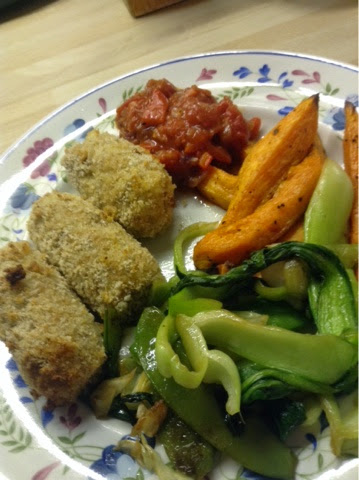
I served them with stir fried bok choi and sugar snap peas, tomato sauce (recipe in the next post) and baked sweet potato wedges (peel and slice the sweet potatoes lengthwise into wedges, toss with sunflower oil, salt and pepper and bake for 30 minutes or so until browned and cooked through).


Monday 2 February 2015

Butternut and Leek Lasagne


Lasagne is always a great veggie option and one where it really doesn't feel like the dish is missing that meaty component. There are loads of options for fillings; this one was based on a Jamie Oliver recipe for Butternut and Sweet Leek Lasagne with a few tweaks and additions and it was delicious.

My tweaks (the full recipe with my additions is below, follow the link above for the original recipe):

I only used 2 tins of tomatoes in the sauce instead of 3 because I was trying to read it without my glasses. However I did add a glass of red wine, some tomato puree and a tin of cooked lentils. I threw in a bit of sugar as it tasted a bit acidic, oh and a chopped red pepper (the antipasto type from a jar lurking in the back of the fridge).

I also didn't drain off any of the liquid from the leeks (maybe the frozen spinach doesn't have as much liquid anyway) but I added some butter and cornflour and some milk to make a bit of white sauce in the leeks. I thought some lemon zest would add a nice extra dimension to the creamy leeks, so about 1 tsp of that went in, along with a good grating of nutmeg, which I liked, although the general consensus was to leave out the lemon zest next time.

Butternut


Jamie Oliver says to cook it without peeling. I wasn't sure about leaving the peel on to bake it; I didnt know you could eat it! It did add a bit of texture, although there was a slightly bitter taste, not entirely unpleasant. I double checked to see if Jamie said to remove the skin after the butternut was baked, but he didn't so I didn't! It certainly speeds up preparing butternut - it's one of those vegetables that I hate peeling. The second time I cooked this, I did remove the peel after I roasted the butternut, which I preferred.

Cheese topping - one quarter (for dad) was left without any veggie hard cheese/grana padana, the rest only had a little as I accidentally grated my finger and gave up on the cheese due to the length of time it took to find and apply a plaster to my finger. The lasagne was cheesy enough anyway (and incidentally no finger scrapings made their way into the lasagne in case anyone was worried). The next time I cooked this, I just sprinkled a little grated mozzarella over the top of the mozzarella chunks, which worked well.


Butternut and Leek Lasagne


  • 1 butternut squash (approximately 1kg)
  • salt and freshly ground black pepper
  • olive oil
  •  2 cloves of garlic
  • 1 tsp dried mixed herbs (Italian seasoning, oregano or whatever)
  • 2 x 400g tins chopped tomatoes
  • 1 tsp or to taste sugar
  • 1 cooked chopped red pepper (antipasto type from a jar)
  • small glass of red wine
  • 1 tbsp tomato puree
  • 1 400g tin green lentils
  • 3 - 4 fairly big  leeks
  • 200g frozen spinach
  • 250g ricotta cheese
  • nutmeg
  • 1 tsp lemon zest (optional)
  • knob of butter
  • 2 tsp cornflour
  • 150 ml semi skimmed milk
  •  300g dry lasagne sheets
  • 1 x 125g ball of mozzarella
  • 100g grana padana cheese or other vegetarian hard cheese (or other grated cheese of your choice)

For the butternut squash


  1. Preheat the oven to 190ºC/375ºF/gas 5
  2. Carefully halve the butternut squash, then scoop out the seeds with a spoon and discard
  3. Chop the squash into 3cm chunks, leaving the peel on
  4. Place the squash in a roasting tray, sprinkle with a pinch of salt and pepper and drizzle well with olive oil, then toss together
  5. Cook in the hot oven for 45 mins - 1 hour, or until soft and cooked through

For the tomato sauce


  1. Peel and finely chop the garlic cloves 
  2. Put a saucepan on a medium heat and add a glug of olive oil, the chopped garlic, dried mixed herbs 
  3. Cook for a couple of minutes, softening the garlic but don't let it burn
  4. Add the tinned tomatoes, wine, lentils, tomato puree and sugar, season with salt and pepper and leave to simmer for 10 minutes.

For the leek mixture


  1. Trim, wash and finely slice the leeks 
  2. Heat a large deep frying pan on a low heat and add a splash of olive oil and a knob of butter 
  3. Add the leeks and sweat slowly for about 10 minutes, or until soft but not browned
  4. Add the cornflour and stir around to cook for a few minutes.
  5. Add the milk and stir over a low heat until thickened
  6. Add the frozen spinach and cook for another minute or two until defrosted and wilted 
  7. Remove from the heat and leave to cool for a few minutes,  
  8.  Mix the ricotta into the pan and season well with nutmeg, salt and pepper (and lemon zest if using)

To assemble the lasagne:


  1. Spoon a layer of the tomato sauce into the bottom of an ovenproof dish (approximately 25cm by 25cm - I found this amount of mixture made another smaller lasagne, which I froze, uncooked) 
  2. Follow with a layer of lasagne sheets 
  3. Spread half of the creamy leeks over the lasagne sheets and poke in half of the chunks of squash,then top with another layer of lasagne
  4. Repeat these layers one more time, adding a little of the tomato sauce to the top layer
  5.  Tear the mozzarella into small pieces and dot over the top of the lasagne • Finely grate the Grana Padana or vege hard cheese, if using over the top 
  6. Cover with tin foil and cook in the hot oven for 20 minutes 
  7. After that, remove the foil and cook for another 20 minutes, or until the lasagne is golden and bubbling